The main window contains two tab windows. The first tab is shown in Figure 1.
When you click any circled number in the picture below, the browser will scroll to the explanation of the numbered item. To return to the picture, click the back button of the browser.
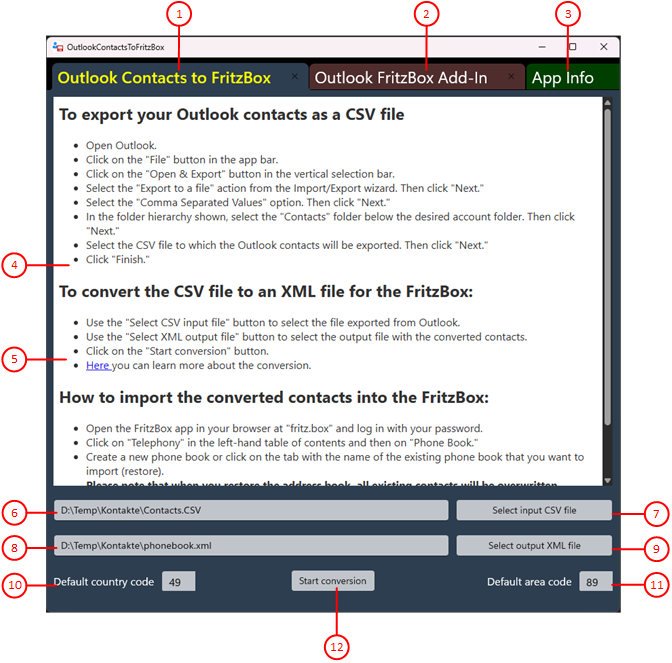
Figure 1: First Tab of the Main Window
- Outlook Contacts to FritzBox
This tab describes how to transfer Outlook contacts to the Fritzbox. You can also configure and start the conversion of contacts here.
- Outlook FritzBox Add-In
This tab describes how you can export Outlook contacts and import FritzBox contacts using an Outlook add-in. The add-in, which can only be used in Outlook 2012 and 2016, must be downloaded from our website and installed as described.
- App Info
This tab displays the app version. You can also find further information online.
- Description
This section describes how to import Outlook contacts into the Fritzbox.
- Details online link
When you click on this link, the details of the conversion will be displayed in a separate browser window.
- Path to CSV input file
Here you can enter the path to the CSV input file or select it using the "Select CSV input file" button.
- Select CSV input file
Click this button if you want to select the CSV input file using the file selection dialog.
- Path to XML output file
Here you can enter the path to the XML output file or select it using the "Select XML output file" button.
- Select XML output file
Click this button if you want to select the Xml output file using the file selection dialog.
- Default country code
Here you can enter the country code to be inserted in all converted telephone numbers that do not contain a country code. Only digits are permitted as input. Leading zeros are not included.
- Default area coude
Here you can enter the area code to be inserted in all converted telephone numbers that do not contain an area code. Only digits are permitted as input. Leading zeros are not included.
- Start Conversion
Click this button to start the conversion. If the output file already exists, you will be asked if you want to overwrite the existing file. The log window, which is displayed next to the main window, shows the converted contacts and any error messages.
- Description
This section describes the add-in and how to install it.
- Learn more and download the add/in
When you click on this link, information about the add-in will be displayed in a separate browser window. You can also download the add-in from there.
- Name and Version of the App
The name, version, and creation date of the app are displayed here.
- Write a review
Click this button if you want to go to the store to write a review about the app that other interested parties can read.
- Send us a support e-mail
Click this button if you want to give us feedback. An e-mail will be prepared for you, which you only need to complete.
- Read privacy policy online
Clicking this button will open a browser window with the app's privacy policy.
The second tab is shown in Figure 2.
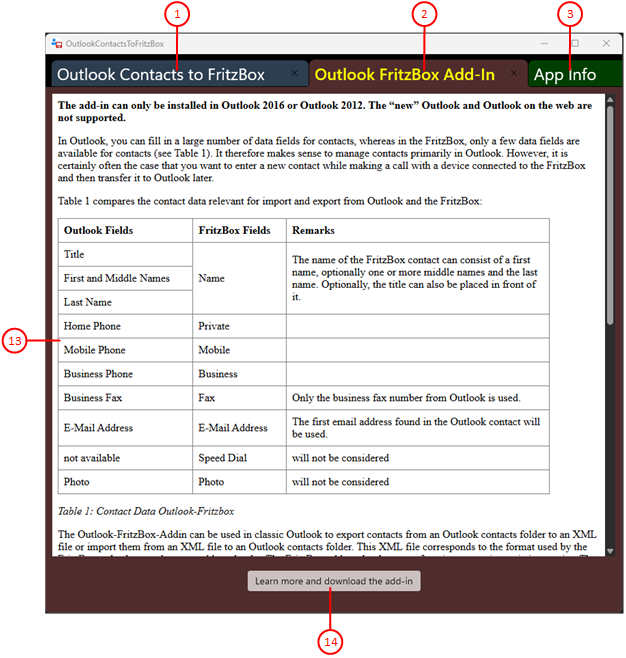
Figure 2: Second Tab of the Main Window
The third tab is shown in Figure 3.
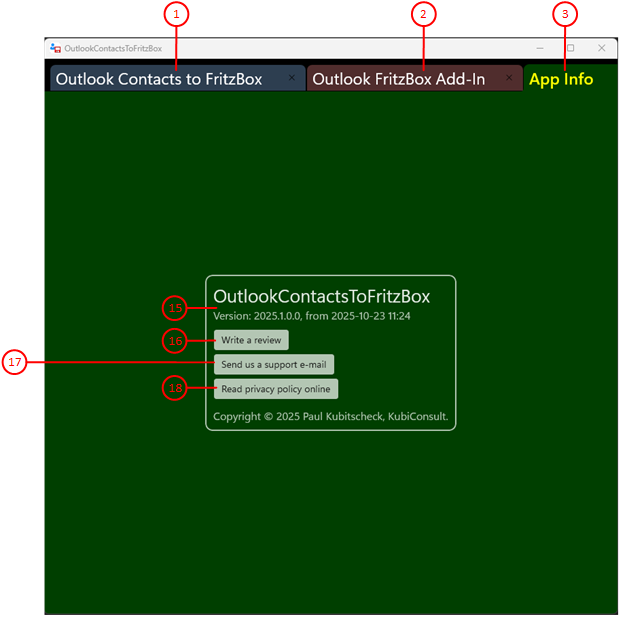
Figure 3: Third Tab of the Main Window
See Also