Figure 31 shows the online group pane.
On this pane, you can create and manage an online user group if you are owner of an active online user group add-on. You can perform the add-on purchase on the app billing pane. The online user group is stored in a Microsoft Azure database and can have with up to 12 members.When you click any circled number in the picture below, the browser will scroll to the explanation of the numbered item. To return to the picture, click the back button.
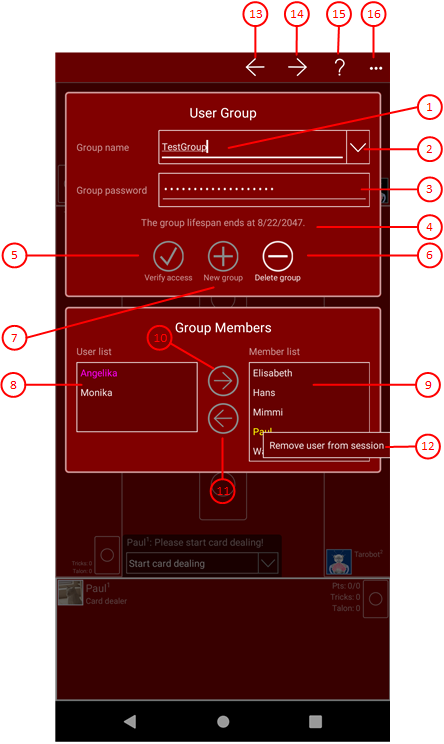
Figure 31: Online Group Pane
- Group name
Here, you must enter the name of a new or existing online user group. The name must start with a capital letter and must contain letters, digits, and hyphens only. The length is limited to 32 characters.
- Drop-down button
Use this button to expand the ListBox with the most recently used credentials. It contains a maximum of five entries with the name of each group and the user name as a key attribute. In addition to the key attribute, the user password and, if necessary, the group administrator password are also stored. When you click on one of these entries, the login information is entered in the appropriate fields. New credentials are only saved if a login was successful. If you click on an entry with the right mouse button or hold the finger on it for about 1 second, commands for deleting entries will be offered to you in a context menu.
- Group password
Here, you must enter the password necessary to maintain an online user group. The password must contain at least 5 and not more than 32 characters. Colons ':' and semicolons ';' must not be used as content.
- Advice
As long as the access to the group is not verified, an advice is shown telling you to press the verify group access button first. If the access is done, the end of the group's lifespan will be shown instead.
-
This button changes its appearance and function:
 Press this button to open the online group.
 This button is displayed when the online group is open. Pressing it closes it again.
 Press this button, to create a new online user group. The button is disabled when the access to the current group is verified.
 Press this button when you want to delete your group. Deletion is not possible while an online session with the group is still active. Even after a group has been deleted, its remaining lifetime is maintained. If you create a new group later, it will retain the remaining lifetime of the deleted group. Contact support if a group can not be deleted or its remaining lifetime is not applied to a new group.
- User list
The local user profiles are listed here. If you successfully access a user group, a local profile is created automatically for each existing member for which no local profile already exists. The online passwords of the members are not transferred in this process. Afterwards, only those names still appear in the user list which are not present in the member list. User profiles with an empty password are disabled and highlighted in the user list. You must define an online password for such users before you can add them to the group as members. On the game users pane, you can create new and update existing user profiles.
- Member list
The members of the group are listed here. If you successfully access a user group, a local profile is created automatically for each existing member for which no local profile already exists. Afterwards, only those names still appear in the user list which are not present in the member list. Members who are currently active in the online session of the current user are highlighted.
 Press this button to add the selected user to the group. The name will then appear in the member list and disappears from the user list. The button is enabled only if the access to the group is verified and an entry in the user list is selected.
 Press this button to remove a member from the group. The entry appears then in the user list and disappears from the member list. The button is enabled only if an entry in the member list is selected.
-
Context menu
If you right-click on a highlighted member item or if you press and hold your finger for about one second on it, a context menu appears. The menu contains the following command:- Remove user from session
If you click this command, the selected user will be removed from the current online group session. This can be necessary for example, if a player has forgotten to log out.
- Remove user from session
 If you click this button, the pane previously shown is made visible again. If no previous pane exists, the current overlay pane disappears only. Alternatively, you can press the Alt+Left-Arrow key combination.
 Press this button to show the session settings pane. Alternatively, you can press the Alt+Right-Arrow key combination. You can adjust the settings for online sessions of the group on this pane.
 Click this button to overlay the game view with the help pane showing online information about the current view content. Alternatively, you can press the F1 key on the keyboard. The help function can be used only if an internet connection is available.
-
 If the current width of the game view does not allow to display all primary commands of the app bar as buttons, the overhanging commands are moved to the list of secondary commands. That list can be opened by pressing this button. Pressing this button also causes the app bar to be displayed in its maximum size. When in maximum size, the app bar shows a description below each button shape. The list of secondary commands is divided into the following sections:
- If primary commands had to be moved due to insufficient width, these are displayed first. This is followed by a horizontal dividing line.
- This is followed by commands for all subsequent overlay panes with which they can be called up directly.
- If an overlay pane provides special commands, these are listed after another dividing line.
- Finally, there is a “<--” command with which you can close the current and all previously displayed overlay panes.